Introduction
![]()
ZX123 Tool is a tool that analyzes, extracts and injects data in SPI flash image files for ZX-Uno, ZXDOS and similar devices.
These are its main features:
-
List the contents of a ZX-Uno, etc. SPI flash image, showing, if possible, the version of BIOS, esxdos, main Spectrum core and optional cores, Spectrum ROMs and several BIOS settings
-
Extract BIOS, esxdos ROM, Spectrum core and/or other cores, Spectrum ROMs to individual files
-
Change some BIOS default options (video mode, keyboard layout, default core, default ROM, etc.)
-
Add or replace FPGA cores and/or Spectrum ROM images (from individual ROM files or RomPack files)
-
If supplied a different kind of file (like a core or BIOS installation file) it will also try to identify its contents
-
For secondary cores, show information about some of the features that they may have (e.g. VGA video out, joystick support, supported SD or microSD formats, etc.)
-
Wipe with zeros all Cores and ZX Spectrum ROMs data
-
Create a copy of the flash image and, optionally, and/or truncate some (or all) of the optional cores (command line only)
-
List, add or extract ROMs from a ROMPack v2 file (command line only)
It uses internally a file zx123_hash.json with the block structure of image files and, optionally, data to identify those blocks. If it is not found, it will try to download it from the repository on GitHub.
Installation
There are different versions of the tool, one that works in a lot of platforms, but that may need to install Python 3, and other versions that doesn’t need it, but aren’t available for all systems.
MacOS
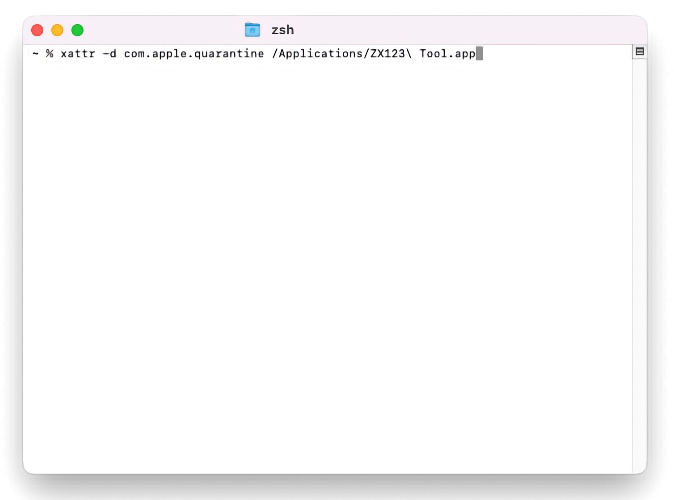
The MacOS binary isn’t digitally signed or notarized, so recent versions of MacOS may not trust it and report that the file is damaged, and should be moved to the bin.
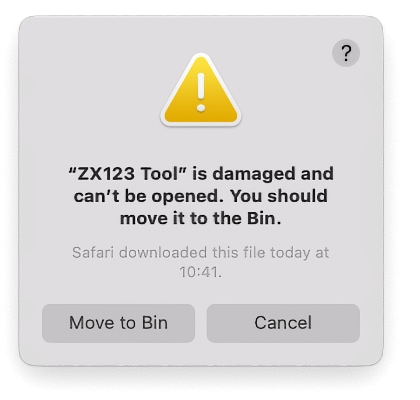
In order to use the app, make sure that you have downloaded it from a trusted source, and then use the Terminal with a command like xattr -d com.apple.quarantine "ZX123 Tool.app" to ignore the warning.
Windows
The Windows binary release requires Microsoft Visual C++ Redistributable 2015 installed on your system and, for Windows 7, also Microsoft Quality Rollup KB4457144 or later.
Once extracted, you have to run from the program (ZX123 Tool.exe) using Python 3.
All platforms
To use the tool this way, you need Python 3 to use it. Depending on the operating system you may have to install it. It has to be version 3.8 or later.
Having Python 3, you only need to download the latest version of the tool from the official repository, following this link.
Once extracted, you have to run from a shell the main script (ZX123 Tool.py) using Python 3. This may change depending on the operating system.
For example, on Windows, it’s usually:
py -3 "ZX123 Tool.py"With other operating systems it is normally like:
python3 "./ZX123 Tool.py"Use
Graphical user interface
The interface is based on a single window configured like this:
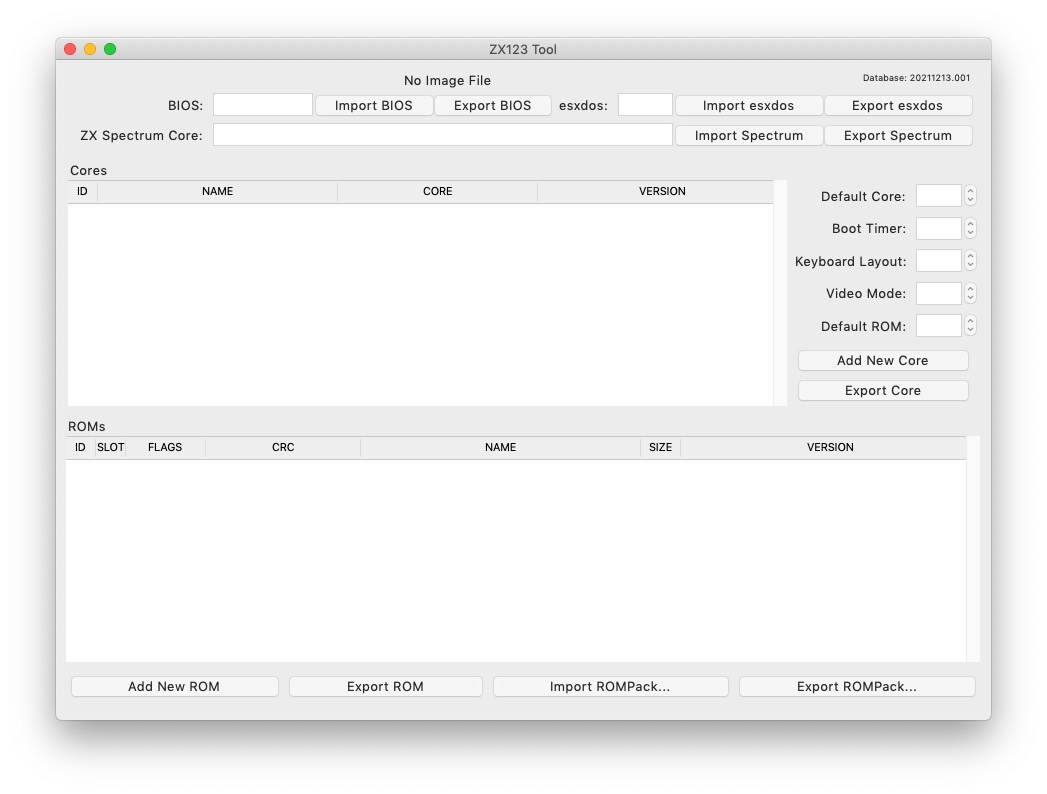
There’s also a menu where you can access options to create a new SPI flash image file, open an existing file (either image or other kind) to analyze or edit (only if it’s a flash image), wipe with zeros all the cores and ROMs data, expand a 16MB ZXDOS+ image to 32MB, stop editing, update the contents of an image, convert between main and secondary core (and vice versa), or show details for the currently selected core.
When opening a non-image file, the tool will try to analyze and catalog it’s contents and show the known details for it:
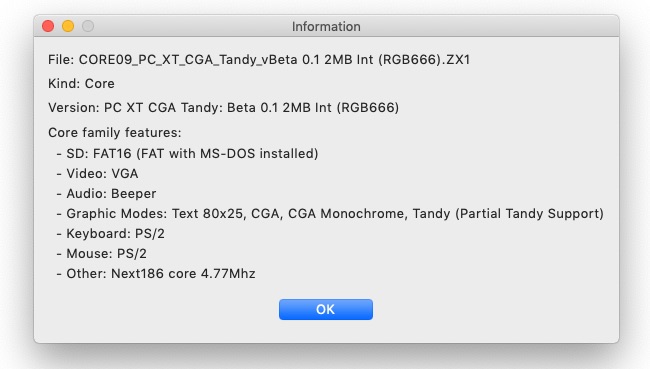
Once an image file is open to edit, it’s possible to make the following modifications.
BIOS
Using the corresponding buttons, it is possible to export a file with the current BIOS (firmware) of the image, or to replace it (Import) with another one.

In addition, you can modify some of the default startup values.
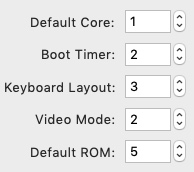
For reference, these are the meanings of some of the values.
Setting |
Description Boot Timer |
0 (No Timer), 1, 2, 3 or 4 |
Keyboard Layout |
0 (Auto), 1 (ES), 2 (EN) or 3 (Spectrum) |
Video mode |
0 (PAL), 1 (NTSC) or 2 (VGA) |
esxdos
Using the corresponding buttons, it is possible to export a file with the current version of esxdos in the image, or to replace it (Import) with another one.

Spectrum Core
Using the corresponding buttons, it is possible to export a file with the current version of the Spectrum main core in the image, or to replace it (Import) with another one.

Secondary cores
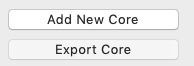
If no secondary core is selected in the list, it is possible to use the button to add a new one.
When one or more cores are selected, it is possible to replace the first one with another one (Import) or to export each of the selected cores to separate files.

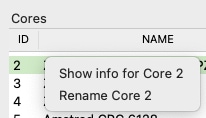
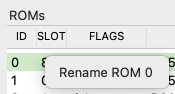
Also, when only a single core has been selected, it is possible to obtain some information or change the name displayed, either by using the options in the menu or with a secondary click on the core list.
Spectrum ROMs
If no ROM is selected from the corresponding list, it is possible to use the Add button to add a new one. You can also replace or export all ROMs in the image using a single ROMPack file (v1).

When one or more ROMs are selected, it is possible to replace the first one with another one of the same size (Import) or to export each of the selected ROMs to separate files.

As in the previous case, when only one ROM has been selected, you can change the displayed name and its parameters with the menu shown with a secondary click on the ROMs list.
When loading a ROM file, you can specify the flags to use when using the ROM, such as memory contention, DivMMC, timings of different Spectrum models, etc.
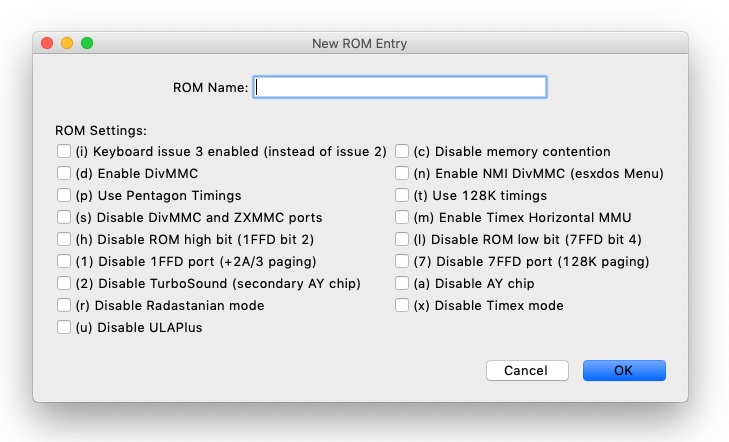
The settings for each ROM are listed with a letter code that is explained in the appendix at the end of this manual.
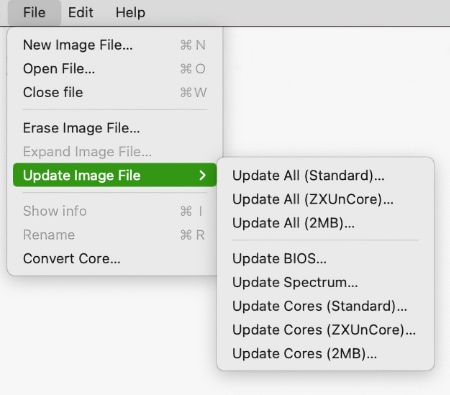
Update an image
From the menu, you can choose several options that try to update, either individually or all together, BIOS and cores to the latest version, according to the contents of the JSON file, being possible, when updating cores, to search for the ZX-Uno standard version, ZXUnCore (RGB666 DAC) adapted cores or 2MB internal memory adapted cores.
Preferences
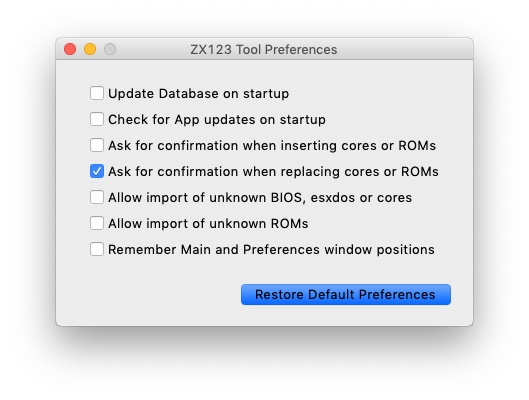
On the preferences window you chan change the default behaviour for some actions of the application.
-
Automatically update the cores, ROMs, etc. database each time that the application is opened
-
Check for new versions of the software, also each time that the application is opened
-
Ask for a confirmation before applying changes when adding a new core or ROM
-
Ask for a confirmation before applying changes when replacing the contents of an existing core or ROM
-
Allow import of unknown versions of BIOS, esxdos or cores
-
Allow import of unknown versions of ZX Spectrum ROMs
-
Remember main window and preferences window positions (if not, both windows are always centered)
Command line interface
All platforms
The CLI can be invoked directly using the script zx123_tool.py and Python (version 3.6 or later), (e.g. python3 zx123_tool.py -l -i FLASH.ZX1)
Arguments
-h, --help          show help and exit
-v, --version       show program's version number and exit
-i INPUT_FILE, --input_file INPUT_FILE
                    ZX-Uno, ZXDOS, etc. File
-d OUTPUT_DIR, --output_dir OUTPUT_DIR
                      Output directory for extracted files
-o OUTPUT_FILE, --output_file OUTPUT_FILE
                      Output flash file to copy
-f, --force           Force overwrite of existing files
-l, --list_contents List file contents
-D, --details       Show Known Core Features
-r, --roms          Process ZX Spectrum ROMs (list or, in extract mode,
                    extract instead of Cores)
-q, --check_updated For each Core or non Spectrum ROM, check version
                    against 'latest' entry in the JSON database
-s, --show_hashes   Show computed hashes
-x EXTRACT, --extract EXTRACT
          Item(s) to extract, split using ",": BIOS, Spectrum, Special,
          ROMS, esxdos and/or core/ROM Number(s)
-n N_CORES, --number_of_cores N_CORES
          Number of cores to keep on output file
-a INJECT_DATA, --add INJECT_DATA
          Data of item to inject with one of these formats:
              BIOS,Path to BIOS binary
              esxdos,Path to esxdos ROM binary
              Spectrum,Path to Spectrum core binary
              Special,Path to Special core binary (for 32Mb SPI flash)
              CORE,Core Number,Name to use,Path to core binary
              ROM,Slot,Parameters,Name to use,Path to Spectrum ROM binary
              ROMS,Path to RomPack file with some ROMs inside
  -R RENAME_DATA, --rename RENAME_DATA
        Data of an item to rename (core or ROM) with the same fomat used
        to inject, but without a file path
-w, --wipe            Wipe all ROMs and all secondary cores from image
-e, --32              Expand, if needed, flash file to 32MiB
-t, --convert   Converts between standard and Spectrum core
-1, --1core  Use, if available, ZXUnCore cores for ZX-Uno
-2, --2mb  Use, if available, 2MB cores for ZX-Uno
-c DEFAULT_CORE, --default_core DEFAULT_CORE
Default core number: 1 and up
-z DEFAULT_ROM, --default_rom DEFAULT_ROM
Index of default Spectrum ROM: 0 and up
-m VIDEO_MODE, --video_mode VIDEO_MODE
Default BIOS video mode: 0 (PAL), 1 (NTSC) or 2 (VGA)
-k KEYBOARD_LAYOUT, --keyboard_layout KEYBOARD_LAYOUT
Default BIOS Keyboard Layout:
0 (Auto), 1 (ES), 2 (EN) or 3 (Spectrum)
-b BOOT_TIMER, --boot_timer BOOT_TIMER
Boot Timer: 0 (No Timer), 1, 2, 3 or 4
-u, --update If it's the only argument, download JSON from repository
If there's an SPI flash image file, update BIOS and Cores to the latest version according to JSON file contents
-N, --nocolours Disable the use of colours in terminal text outputExamples
Show contents of file:
python3 zx123_tool.py -i FLASH.ZXD -l
Show contents of file, including the installed cores and ZX Spectrum ROMs data:
python3 zx123_tool.py -i FLASH.ZXD -l -r
Show the installed cores, and list known features of them:
python3 zx123_tool.py -i FLASH.ZXD -l -D
Extract FIRMWARE.ZXD file from FLASH32.ZXD file (on Windows):
py -3 zx123_tool.py -i FLASH32.ZXD -x BIOS
Extract the third ZX Spectrum ROM to a file:
...zx123_tool.py -i FLASH32.ZXD -r -x 3
Extract all Spectrum ROMs to ROMS.ZX1 RomPack file from FLASH32.ZXD file:
...zx123_tool.py -i FLASH32.ZXD -x ROMS
Show contents of file and extract SPECTRUM.ZXD, ESXDOS.ZXD and .ZXD files for cores 1 and 3:
...zx123_tool.py -l -i FLASH32.ZXD -x Spectrum,3,1,esxdos
Add core NEXT.ZXD as number 3, with name SpecNext:
...zx123_tool.py -i FLASH.ZXD -o FLASHnew.ZXD -a CORE,3,SpecNext,NEXT.ZXD
Add core NEXT.ZXD as number 3, with name SpecNext, and set as the default boot core:
...zx123_tool.py -i FLASH.ZXD -o FLASHnew.ZXD -a CORE,3,SpecNext,NEXT.ZXD -c 3
Add file 48.rom (Spectrum ROM) in slot 5, with name Spec48:
...zx123_tool.py -i FLASH.ZXD -o FLASHnew.ZXD -a ROM,5,xdnlh17,Spec48,48.rom
Set ROM with index 2 (do not mistake with slot index) as the default Spectrum ROM:
...zx123_tool.py -i FLASH.ZXD -o FLASHnew.ZXD -z 2
Add BIOS and esxdos ROMs:
...zx123_tool.py -i FLASH.ZXD -o FLASHnew.ZXD -a BIOS,FIRMWARE.ZXD -a esxdos,ESXMMC.BIN
Replace all Spectrum ROMs with the contents of MyROMS.ZX1 RomPack file:
...zx123_tool.py -i FLASH.ZXD -o FLASHnew.ZXD -a ROMS,MyROMS.ZX1
Wipe all ROMs data and all secondary cores data:
...zx123_tool.py -i FLASH.ZXD -w -o FLASHempty.ZXD
Wipe all ROMs data and all secondary cores data, and then add file 48.rom (Spectrum ROM) in slot 0, with name ZX Spectrum:
...zx123_tool.py -i FLASH.ZXD -w -o FLASHnew.ZXD -a "ROM,0,xdnlh17,ZX Spectrum,48.rom"
Create a copy of FLASH32.ZXD, but removing all cores and setting BIOS default to VGA and Spectrum keyboard layout:
...zx123_tool.py -i FLASH32.ZXD -o FlashGDOSPlus.ZXD -n 0 -m 2 -k 3
Find out the version of a BIOS installation file:
...zx123_tool.py -i FIRMWARE.ZXD -l
Convert the contents of a classic ROMPack file to a ROMPack v2 file:
...zx123_tool.py -i ROMS_255_orig.ZX1 -o ROMS_255.ZX1 -a ROMS,MyROMS.ZX1
Add a ROM to a ROMPack v2 file:
...zx123_tool.py -i ROMS_255_orig.ZX1 -o ROMS_255.ZX1 -a "ROM,0,xdnlh17,ZX Spectrum,48.rom"
...zx123_tool.py -i ROMS_255_orig.ZX1 -o ROMS_255.ZX1 -a ROMS,MyROMS.ZX1
Extract ROMs with indexes 3, 5 and 6 from a ROMPack v2 file:
...zx123_tool.py -i ROMS_255.ZX1 -x 3,5,6
Appendix
ROM parameters
| Parameter | Description |
|---|---|
|
Keyboard issue 3 enabled (instead of issue 2) |
|
Disable memory contention |
|
Enable DivMMC |
|
Enable NMI DivMMC (esxdos Menu) |
|
Use Pentagon Timings |
|
Use 128K timings |
|
Disable DivMMC and ZXMMC ports |
|
Enable Timex Horizontal MMU |
|
Disable ROM high bit (1FFD bit 2) |
|
Disable ROM low bit (7FFD bit 4) |
|
Disable 1FFD port (+2A/3 paging) |
|
Disable 7FFD port (128K paging) |
|
Disable TurboSound (secondary AY chip) |
|
Disable AY chip |
|
Disable Radastanian mode |
|
Disable Timex mode |
|
Disable ULAPlus |
JSON file
The JSON file is an object where the main name are file extensions (like ZXD or ZX1). All the data in the JSON is stored as a string. For each of the possible extensions, there is another object with the following structure:
(...)
"(Extension)": {
    "description" -> Short Description of the platform asssociated (e.g. "ZXDOS+")
    "hashtype"    -> "sha256sum" at this moment
    "parts": {    -> Description of SPI Flash Main Blocks
                      For each of these, an array is provided with this data:
                            [offset, size, <output name>, <magic bytes>]
                      The blocks are:
                        - "header"    -> File header and descriptors
                        - "esxdos"    -> esxdos binary ROM
                        - "roms_dir"  -> Description of installed Spectrum ROMs
                        - "cores_dir" -> Description of installed extra FPGA cores
                        - "BIOS"      -> Binary image of firmware
                        - "roms_data" -> Spectrum ROMs binary data
                        - "Spectrum"  -> Main FPGA core
                        - "Special"   -> Special core (if it exists) for 32Mb SPI flash
                        - "core_base" -> Extra cores starting offset and size
    },
    "BIOS": {   -> Dictionary of hashes for different firmware versions in the format:
                    latest" -> Name of the latest version and (optionally) download URL
                    "versions":  {   -> Hash Dictionary
                                        "(Version Description)": "(Hash)",
                    }
    },
    "esxdos": {  -> Dictionary of hashes for different esxdos ROM versions in the format:
                    "latest" -> Name of the latest version
                    "versions":  {   -> Hash Dictionary
                                        "(Version Description)": "(Hash)",
                    }
    },
    "Spectrum": {   -> Dictionary of hashes for different Spectrum core versions in the format:
                        "latest" -> Name of the latest version and (optionally) download URL
                        "versions":  {   -> Hash Dictionary
                                            "(Version Description)": "(Hash)",
                        }
"Special": { -> Dictionary of hashes for different Special core versions in the format:
"latest" -> Name of the latest version and (optionally) download URL
"versions": { -> Hash Dictionary
"(Version Description)": "(Hash)",
}
"Cores": { -> Dictionary for different FPGA cores
"(Core name)": { -> Dictionary of hashes for different core versions in the format:
"latest" -> Name of the latest version and (optionally) download URL
"base" -> Name of another version with download URL if there's no URL for the latest
"versions": { -> Hash Dictionary
"(Version Description)": "(Hash)",
},
"features": { -> Feature info Dictionary
"Category": [["Feature", "Feature", ...], "Note"]
}
},
(...)
}
}.
(...)roms_dir format:
[roms directory offset, directory block size, "", "", enabled entries offset, first ROMs block length, second ROMs block length]cores_dir format:
[cores directory offset, directory block size, "", "", first cores block length, second cores block length]roms_data format:
[first slot offset, first ROMs block size, "", "", second ROMs block offset],core_base format:
[first core offset, core length, "", First bytes of a binary core data, second cores block offset]ROMPack v2
ROMPack v2 files are based on classic ROMPack files, used to extract and insert all the ROM files in a ZX-Uno, ZXDOS SPI flash. Classic ROMpack files have 64 ROM slots while ROMPack v2 files have 255 ROM slots. The file structure of a ROMPack file is as follows:
| Start | End | Description |
|---|---|---|
|
|
Signature 'RPv2' |
|
|
Reserved. Unused (pad with |
|
|
Up to 255 64 bytes blocks (ROM Entries) (pad with |
|
|
Up to 255 1 byte blocks with ROM Index Entries (pad with |
|
|
Default ROM Index (1 byte) |
|
|
Up to 255 16384 bytes ROM slots (pad with |
Each ROM Entry block has this internal structure:
| Start | End | Description |
|---|---|---|
|
|
Slot offset |
|
|
Slot size |
|
|
Flags 1: |
|
Bit |
Machine timings: |
|
Bit |
NMI DivMMC: |
|
Bit |
DivMMC: |
|
Bit |
Contention: |
|
Bit |
Keyboard issue: |
|
|
Flags 2: |
|
Bit |
AY chip: |
|
Bit |
2nd AY chip (TurboSound): |
|
Bit |
|
|
Bit |
|
|
Bit |
ROM low bit: |
|
Bit |
ROM high bit: |
|
Bit |
horizontal MMU in Timex: |
|
Bit |
DivMMC and ZXMMC ports: |
|
|
crc16-ccitt values. Up to 4 16-bit values in reverse order |
|
|
unused |
|
|
Name of ROM in ASCII, space padded |
Compiling ZX123 Tool
Compiling on windows
Preparing the environment
In order to build binary executables on Windows, you have to follow these steps have a valid environment:
-
Install Microsoft development tools (Visual Studio). It is enough to install only "Visual Studio Build Tools".
-
Install Python 3.x (not necessarily for all users or included in PATH), for example, with the installer available at the official web.
-
Create a virtual environment for Nuitka and associatede modules. For example:
py -3 -m venv zx123build-
Install all the needed modules:
.\zx123build\Scripts\python3.exe -m pip install pip setuptools --upgrade
.\zx123build\Scripts\python3.exe -m pip install wheel nuitka zstandard ordered-set|
If you want to build 32-bit binary files, you have to use a 32-bit Python installation, with its own environment. If you want 64-bit, you will need another different environment, with a 64-bit Python installation. Both environments can be in the same computer. |
Using the environment
Use Nuitka to make the files, for example with a command like:
.\zx123build\Scripts\python3.exe -m nuitka "...\zx123_tool\ZX123 Tool.py" --output-dir=.\zx123build\win_x86_64 --standalone --lto=yes --enable-plugin=tk-inter --windows-disable-console --windows-icon-from-ico="...\zx123_tool\ZX123 Tool.ico" --windows-company-name="kounch" --windows-product-name="ZX123 Tool" --windows-file-version="3.6.1.0" --windows-product-version="3.6.1.0" --windows-file-description="ZX123 Tool"This example would create all the binary files inside the directory .\zx123build\win_x86_64.
Compiling and building the distribution in MacOS
Preparing the environment
To have an environment than can build all MacOS binaries and also all the distribution files (DMG image files, ZIP files, etc.) you have to follow these steps:
-
Install Xcode Command Line Tools
xcode-select --install-
Install Python 3.x (doesn’t need to be for all users or added to the PATH), for example, using the installer from the official website.
|
The Python version included with the command line tools does not work with Nuitka. |
-
Create a directory with enough space (800MB or more), or create a disk image file to keep all the project data:
hdiutil create -size 1G -type SPARSE -fs 'Case-sensitive APFS' -volname zx123build -attach zx123build-
Install CMake, for example, inside the previously created disk image (inside
/Volumes/zx123build/Applications/CMake.app)
-
Create a Python virtual environment for Nuitka and other modules. For example, with Python 3.10 and the disk image:
/Library/Frameworks/Python.framework/Versions/3.10/bin/python3 -m venv /Volumes/zx123build/-
Install all required modules inside the virtual environment:
/Volumes/zx123build/bin/python3 -m pip install pip setuptools --upgrade
/Volumes/zx123build/bin/python3 -m pip install wheel nuitka zstandard ordered-set-
Obtain the create-dmg tool and install, for example, next to CMake (inside
/Volumes/zx123build/Applications/create-dmg) -
Create a new directory for all the compilation neede files, and the results. For example, inside disk image:
mkdir /Volumes/zx123build/build-
Copy into two subdirectories named
win_x86_32(32-bit) andwin_x86_64(64-bit) the files previously built with Windows.
Using the environment
Now, whenever you want to build binary files, etc. you have to give acces to the directory where the environment is (if it’s inside a disk image, make sure that it is mounted).
export PATH=/Volumes/zx123build/bin:/Volumes/zx123build/Applications/CMake.app/Contents/bin:/Volumes/zx123build/Applications/create-dmg:${PATH}Get inside the build directory, and initialize CMake using the project source code.
cd /Volumes/zx123build/build
cmake -G "Unix Makefiles" .../zx123_tool
Finally, use the make command to build and make all the files.
Copyright
Copyright (c) 2020-2022, kounch All rights reserved.
Redistribution and use in source and binary forms, with or without modification, are permitted provided that the following conditions are met:
-
Redistributions of source code must retain the above copyright notice, this list of conditions and the following disclaimer.
-
Redistributions in binary form must reproduce the above copyright notice, this list of conditions and the following disclaimer in the documentation and/or other materials provided with the distribution.
THIS SOFTWARE IS PROVIDED BY THE COPYRIGHT HOLDERS AND CONTRIBUTORS "AS IS" AND ANY EXPRESS OR IMPLIED WARRANTIES, INCLUDING, BUT NOT LIMITED TO, THE IMPLIED WARRANTIES OF MERCHANTABILITY AND FITNESS FOR A PARTICULAR PURPOSE ARE DISCLAIMED. IN NO EVENT SHALL THE COPYRIGHT HOLDER OR CONTRIBUTORS BE LIABLE FOR ANY DIRECT, INDIRECT, INCIDENTAL, SPECIAL, EXEMPLARY, OR CONSEQUENTIAL DAMAGES (INCLUDING, BUT NOT LIMITED TO, PROCUREMENT OF SUBSTITUTE GOODS OR SERVICES; LOSS OF USE, DATA, OR PROFITS; OR BUSINESS INTERRUPTION) HOWEVER CAUSED AND ON ANY THEORY OF LIABILITY, WHETHER IN CONTRACT, STRICT LIABILITY, OR TORT (INCLUDING NEGLIGENCE OR OTHERWISE) ARISING IN ANY WAY OUT OF THE USE OF THIS SOFTWARE, EVEN IF ADVISED OF THE POSSIBILITY OF SUCH DAMAGE.
"Loupe PNG image" from http://pngimg.com is licensed under CC BY-NC 4.0
Jarik Marwede (Center tk window <https://github.com/jarikmarwede/center-tk-window>)
MIT License
Copyright (c) 2019 Jarik Marwede
Permission is hereby granted, free of charge, to any person obtaining a copy of this software and associated documentation files (the "Software"), to deal in the Software without restriction, including without limitation the rights to use, copy, modify, merge, publish, distribute, sublicense, and/or sell copies of the Software, and to permit persons to whom the Software is furnished to do so, subject to the following conditions:
The above copyright notice and this permission notice shall be included in all copies or substantial portions of the Software.
THE SOFTWARE IS PROVIDED "AS IS", WITHOUT WARRANTY OF ANY KIND, EXPRESS OR IMPLIED, INCLUDING BUT NOT LIMITED TO THE WARRANTIES OF MERCHANTABILITY, FITNESS FOR A PARTICULAR PURPOSE AND NONINFRINGEMENT. IN NO EVENT SHALL THE AUTHORS OR COPYRIGHT HOLDERS BE LIABLE FOR ANY CLAIM, DAMAGES OR OTHER LIABILITY, WHETHER IN AN ACTION OF CONTRACT, TORT OR OTHERWISE, ARISING FROM, OUT OF OR IN CONNECTION WITH THE SOFTWARE OR THE USE OR OTHER DEALINGS IN THE SOFTWARE.